I've made a couple of winter activities and put them on AdaptedLearning.com
Winter Draw a Picture--Allows students to draw a picture with either a snowy background or an indoor Christmas scene. Can be used easily by switch users.
Winter Matching Word to Picture--Students can match words to winter themed words.
Showing posts with label Adapted Learning. Show all posts
Showing posts with label Adapted Learning. Show all posts
Friday, November 20, 2009


Wednesday, October 28, 2009
Edible Eyesicles Adapted Recipe
Hi all! I created a symbolated version of the recipe with a modification (using pudding cups instead of making the pudding) and posted it on Adapted Learning if you want to use this with your class this week. Here is the link. Happy Halloween!
Thursday, October 1, 2009
Adapted Learning
I made this handout about how to download activities from AdaptedLearning.com today for some of the teachers I am working with because I like visuals and I think it's always good to have things written down for future reference. Enjoy and pass it on to anyone you think could use it!


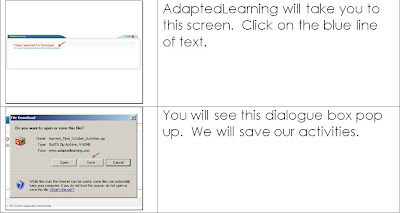
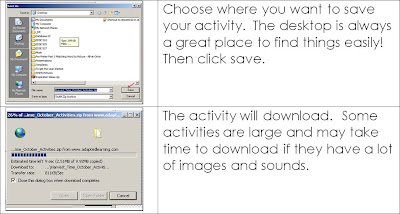
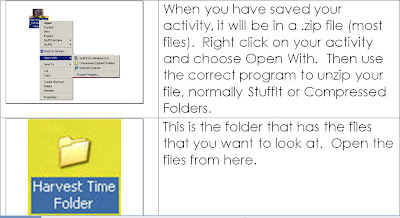
Hope these help you in your downloading!
Hope these help you in your downloading!
Monday, August 24, 2009
Edmark--Part IV
Interactive Edmark
Last year, I had the joy of a SMARTBoard in my classroom. So when BM came out with their Word Scramble Template, I was overjoyed! Here was a great way for my kids to practice spelling their Edmark Words with a visual! I got feedback that if I wanted I could use for state portfolios! I can vary the feedback given as well as whether or not the kids are going to see the word and copy it or if they are going to have to spell on their own! So, I put together a set of word scrambles for the 150 Edmark words of Level 1, in groups of ten.
Then, I had to figure out an easy way to allow my kids to access this because most likely they would be completing this activity with a paraprofessional. So, I decided to use Powerpoint. This is what I came up with:
My kids recognized their name so they would go to their column and pick a list to work on. Each student's lists were differentiated based on where they were on word acquisition. It was easy to add or remove a list as well.
Here's how I did it.
1. Open Powerpoint and start a new blank template. Pick a background/design if you wish.
2. I chose a slide layout of title and content. 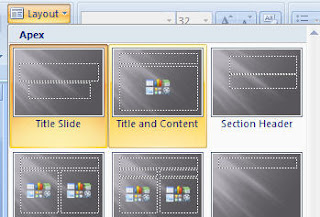
3. I made a table big enough to hold one space for the student's name and one space to hold the lists.
4. I wrote in students names and the lists I wanted available to the student.
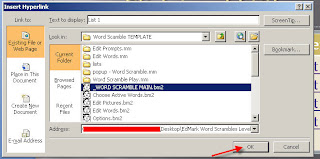
5. I highlighted List X and then used ctrl-K to make a hyperlink. I want to link to the file I downloaded to my desktop. So I used the top drop down menu to find my file and click on it.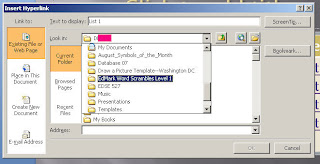
6.Then I navigated to the correct word list since there are 15 folders in the first file.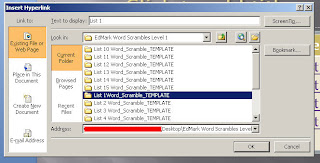
7. I double clicked to open through the file until I found the main page file. I highlighted that and then clicked OK. Voila! My Powerpoint will now link to the main page of that list.
All I had to do was link the rest of the necessary lists and save the Powerpoint. On days that I wanted that to be an option, I would open the file, push F5 and my kids would go up and choose a list to work on.
If I had kids who didn't recognize their name, I might use their picture on the slide, instead of their name. I might also give them less options and have their picture simply link to the one list I wanted them to work on.
The only caution I have for you is that I haven't yet figured out a way to link from templates back to other programs--so you might have to make yourself available to switch the programs between users. Or better yet, teach your students or assistants how to!
I believe this is the last in my series of posts on Edmark. At least for now. Hope this will help to stave off the dreaded Edmark coma for the 2009-2010 school year!
Friday, August 7, 2009
Edmark--Part II
Well, it's time to finish that post about avoiding the dreaded Edmark Coma. These resources are a bit more tech-y or take more time to prepare. These resources pertain to Edmark Level 1, despite the fact that the title is Edmark--Part II. ;)
BoardMaker + Edmark=Fabulousness!
There are lots of options for using Edmark and Boardmaker. Let's start with the Print Options.

BoardMaker + Edmark=Fabulousness!
There are lots of options for using Edmark and Boardmaker. Let's start with the Print Options.
- Matching word and picture:
Some options beyond paper and pencil: laminate the paper and use Wikisticks or Play Doh to match the word and picture, use overhead/erasable markers or crayons to match the word and picture, or even using water colors. Another great way to get more bang from your buck is to draw lines the first time and then have them cut the words and glue them next to the picture the second time!
- Writing the word next to a picture:
This is another fairly simple BM worksheet to make. Instead of making a second box with a word, use the line tool and draw a straight line for the word to be written on. Depending on your child's spelling abilities you might need to provide some supports in the form of a picture dictionary, a list of words known, using their Edmark cards, or an adult. For your students with fine motor difficulties who can't use pencils or for those who don't want to use pencils, consider using these alternatives: markers, magnetic letters, Lakeshore Learning's Lace-A-Word Beads, or letter stamps.
- File Folder Games:
You can use BM to make your own file folder games for you students. (This is an idea I got from another teacher as well.) You can customize them to your students needs but here is the basic idea. Start by creating a worksheet for your students to use. For our purposes, let's use match the word to the picture from the above post. Print out the worksheet and glue down the pictures only. Then you can laminate the folder and the remaining boxes with words. (Use the soft bendable lamination, not the hard kind ;). Now you are going to put down velcro. I try to use the "soft stays" rule (the soft side goes on the item that will do the holding and the rough side goes on the picture or item to be placed) for this. Put a small square of soft velcro next to each picture for the words to be placed on. On the other side of the folder, put down a large stripe of soft velcro for the word boxes to stay on when not in use. I usually put a stripe down the whole side of the folder for two reasons: 1) it's easier to quickly place the word boxes and mix them up on a large strip and 2) I always seemed to end up with a lot more soft than rough velcro. Then go ahead and cut out your word boxes and put a small square of rough velcro on each box. Your folder should look somewhat like this, where the gray areas represent velcro.
 You'll probably want to have more than three words per folder; this graphic was for demonstration purposes. Another great thing about file folders is they are easy to send home for homework (as long as you trust your students to bring them back) and a great way for students to show off their knowledge to mom and dad. These are also great things to do with substitutes or peer buddies.
Here are some other, pre-made print resources that Mom2Mikey at AdaptedLearning.com has posted. She has made these on her own and they are great! They include picture word matching, word writing, tile activities, and multiple choice circle the word. You can find links to these activities here. 
Alright friends out there in cyberspace, I think this post is long enough, so I guess we'll just have to look forward to more!
Subscribe to:
Posts (Atom)


